Compact Flash (CF) cards are widely used for storing data in digital devices such as cameras, camcorders, and other portable devices. However, CF cards are prone to corruption due to various reasons like physical damage, virus attack, sudden power outages, or improper ejection. When CF cards get corrupted, it can lead to data loss if no backup is taken, which can be frustrating and stressful. All of the videos from your holiday - gone! This article will discuss reliable solutions to recover corrupted CF card on Mac.
Basic Troubleshooting for Corrupt CF Card on Mac
Before attempting any CF card data recovery methods, it is essential to perform some basic troubleshooting to identify the cause of the issue. Here are some basic troubleshooting steps to follow:
- Check the card connections and slot - Sometimes, the CF card might not work properly if inserted incorrectly on your Mac. Ensure that the card is inserted correctly and securely.
- Make sure the pins are all straight in the reader and that you haven’t bent any over in the insertion process.
- If the pins are straight, restart your Mac and try a different card reader - Restarting the Mac can help fix any software-related issues. If the card is still not working, try using a different card reader.
- Check if the card is visible in Disk Utility - Disk Utility is a built-in tool on Mac that allows users to manage and repair disks. Open Disk Utility and check if the CF card is visible. If it is, try repairing the disk using the First Aid feature.
- Check if the card is visible in another device (Like the camera you used it in last, for example) - If the CF card is still not working, try inserting it into another device to see if it is visible. If it is not visible, then the card might be physically damaged, and data recovery may not be possible.
Methods to Recover Deleted Files from CF card on Mac
If the CF card is corrupted, it might not be possible to access the data directly. However, there are several methods to recover deleted files from your CF card on your Mac. Here are some methods to try:
1. Manual Method using Trash
This method involves checking the Trash folder and searching for lost files. If the files are not in the Trash, try using the Spotlight search feature to search for the files. I’ve detailed these methods below.
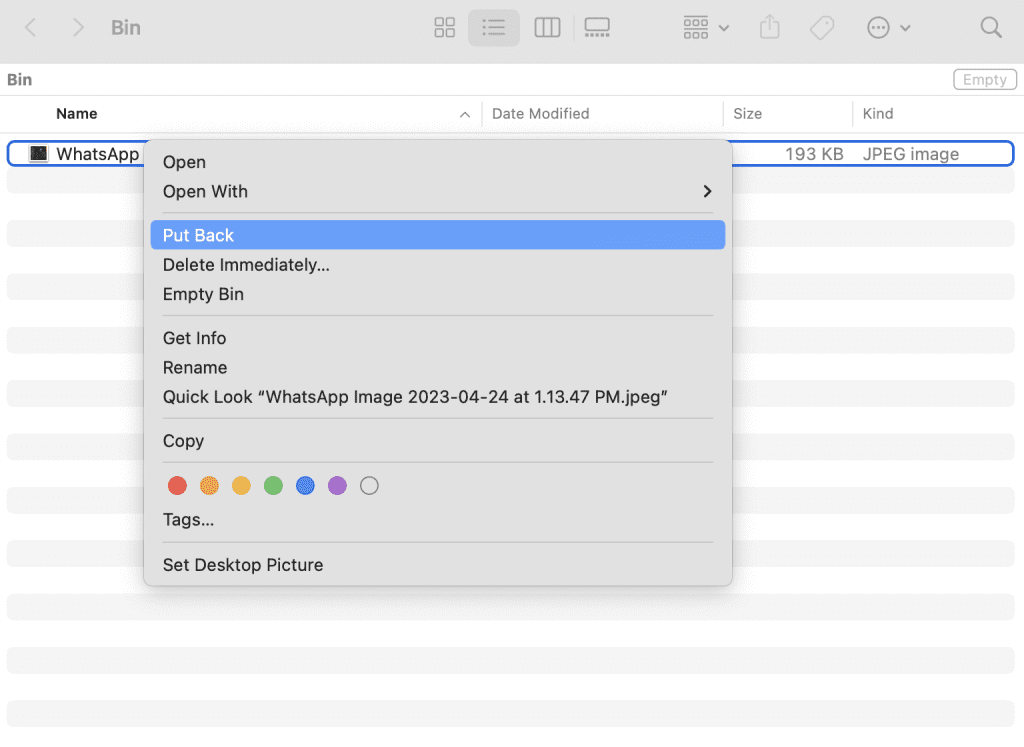
To search the Trash - If you move your mouse pointer to the lower right corner of your screen, you will spot an icon that looks like a small bin or trash can. When you click on that, a Finder window will open to display the contents. Look at the names of the files in that bin, and if you happen to spot the file you’re looking for (when that file is highlighted with a single click in the bin, if you press your space bar, you’ll get a preview of the file to make sure it’s the correct one!) you can control+click and choose the Put Back option in the menu, and the file will go back to where it was before it was deleted.
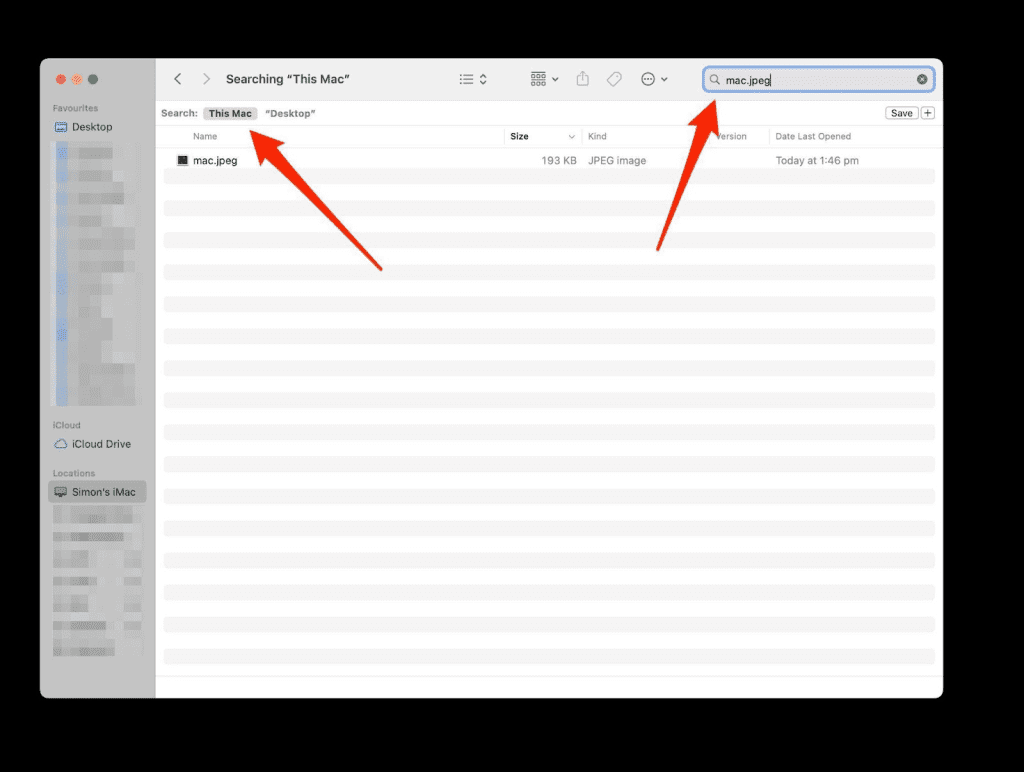
To search with Spotlight in Finder - Open a Finder window by clicking the Finder icon on the bottom left of your screen, then type the filename / what you remember of the filename, or for example, if you’re searching for a photograph, type ‘photo’ in the search box in the top right, and hit Enter on your keyboard. You will find all lost photos on your Mac computer! You can also narrow the search area by clicking on Desktop rather than This Mac so that the search only applies to files on your desktop (or wherever you opened the finder window from, for example, if you’re in the Documents folder on your Mac, you can narrow your search to only look in the Documents folder.
2. Best CF card Recovery Software Mac
There are several SD card data recovery software packages available on the Mac platform that can help to recover deleted files from your CF card. Remo Recover Mac is one such software. It can recover data from corrupted, formatted, and inaccessible CF cards. It has an easy-to-navigate, user-friendly interface and supports recovery on all types of SD cards.
Here are the steps to recover CF card data using Remo Recover Mac:
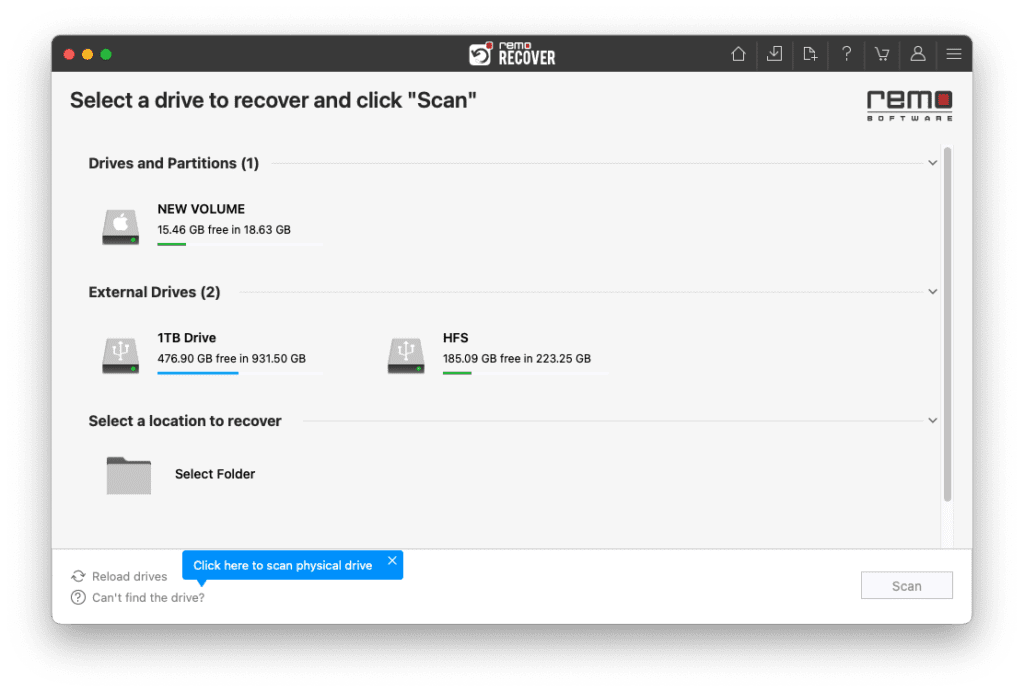
Step 1: Launch Remo Recover on your Mac, select the CF card, and click on Scan.
Step 2: Once the QuickScan is completed click on Dynamic Recovery View to see the initial recovered data from the CF card, You can view the recovered data in the Lost and Found and Deleted Files folders.
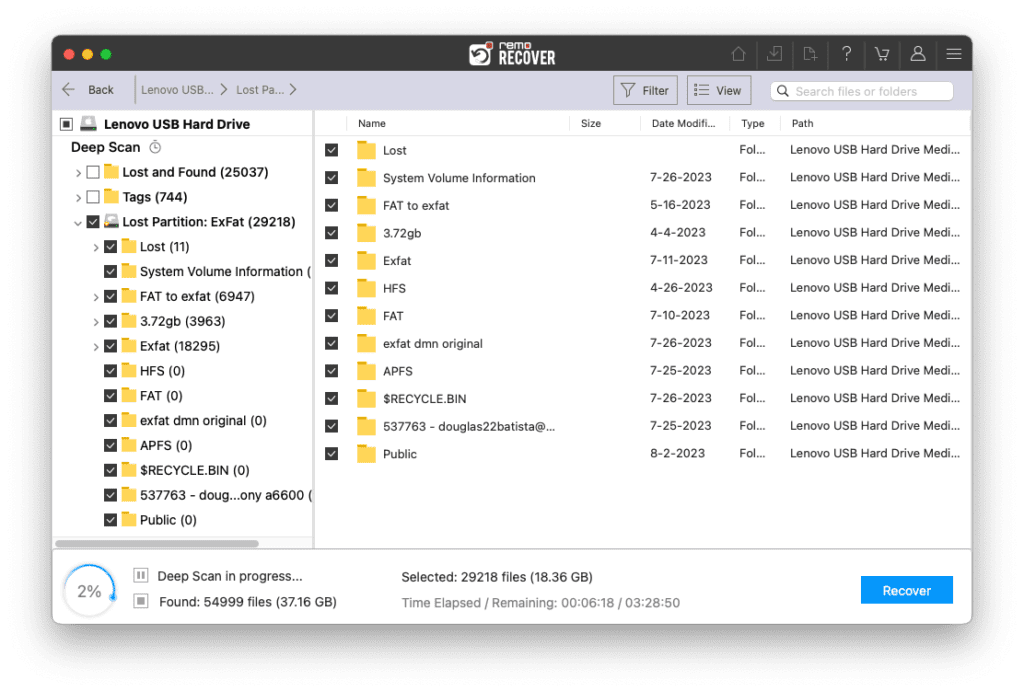
Step 3: Double-click on any file to preview the recovered files.

Step 4: After previewing, select the files that you would like to save and click on the Recover button to save the file in your preferred location.

Caution🛑: To avoid losing them again, make sure you save the recovered files in a different location from the previous one.
Methods to Fix Corrupt CF Card on Mac
If the CF card is corrupted, it might be possible to fix it using proven methods. Here are some methods to try:
Using First Aid in Disk Utility to Repair the Card
Step 1: Open Disk Utility, select the CF card and click on First Aid.
This feature can check and repair any disk-related issues. To attempt a repair on your corrupt memory card, you can go ahead and open Disk Utility. You can press the command and space bar on your keyboard and then type disk utility and press Return, Disk Utility will open on your screen.
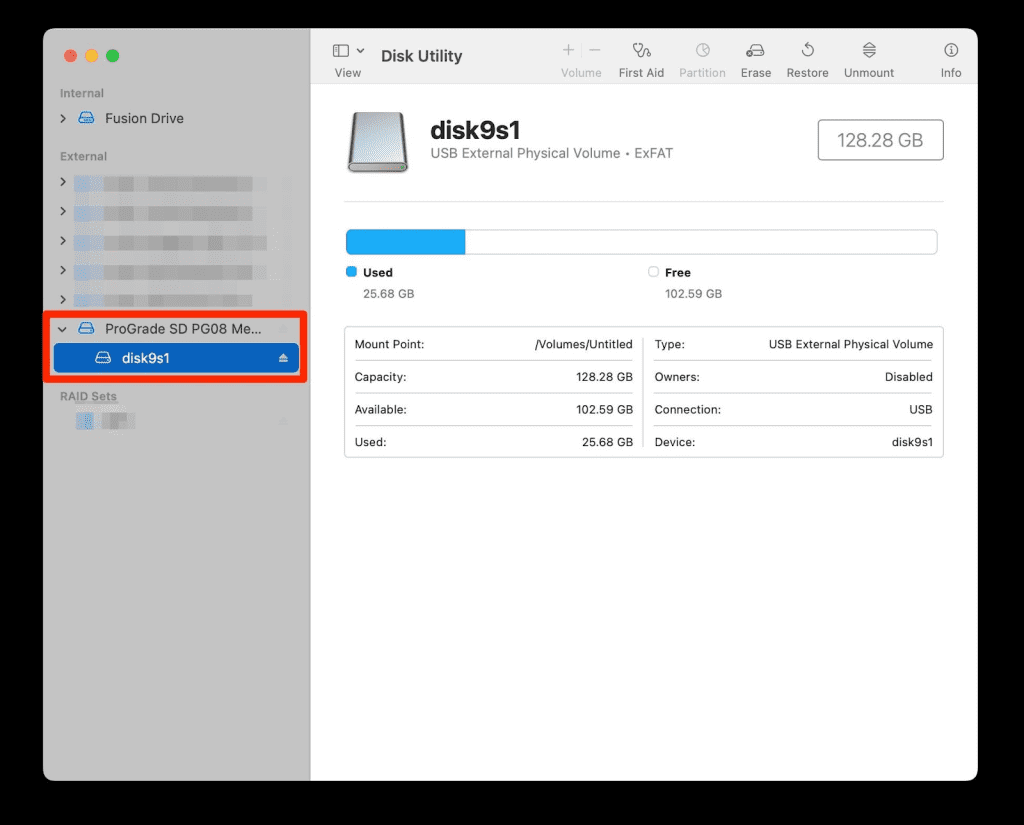
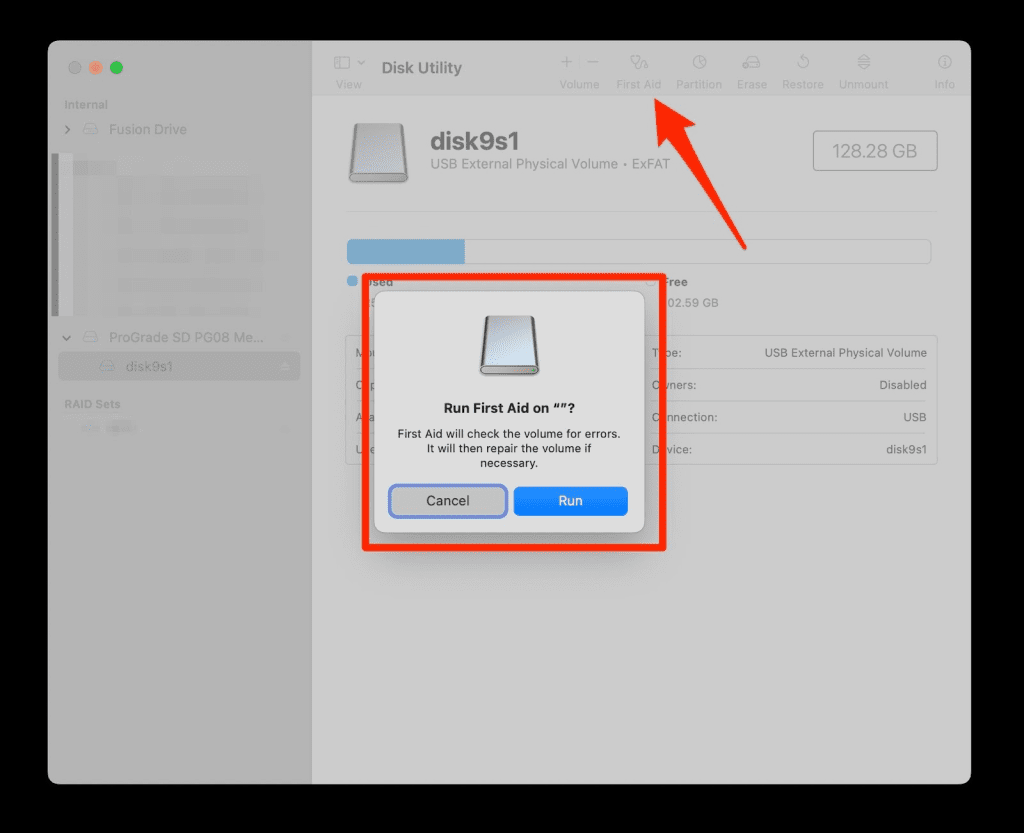
Step 2: You will see a list of possible disks, internal, external, and maybe raid sets too, you start by clicking on your memory card, and then simply hitting the First Aid option at the top of the Disk Utility window and then choose Run.
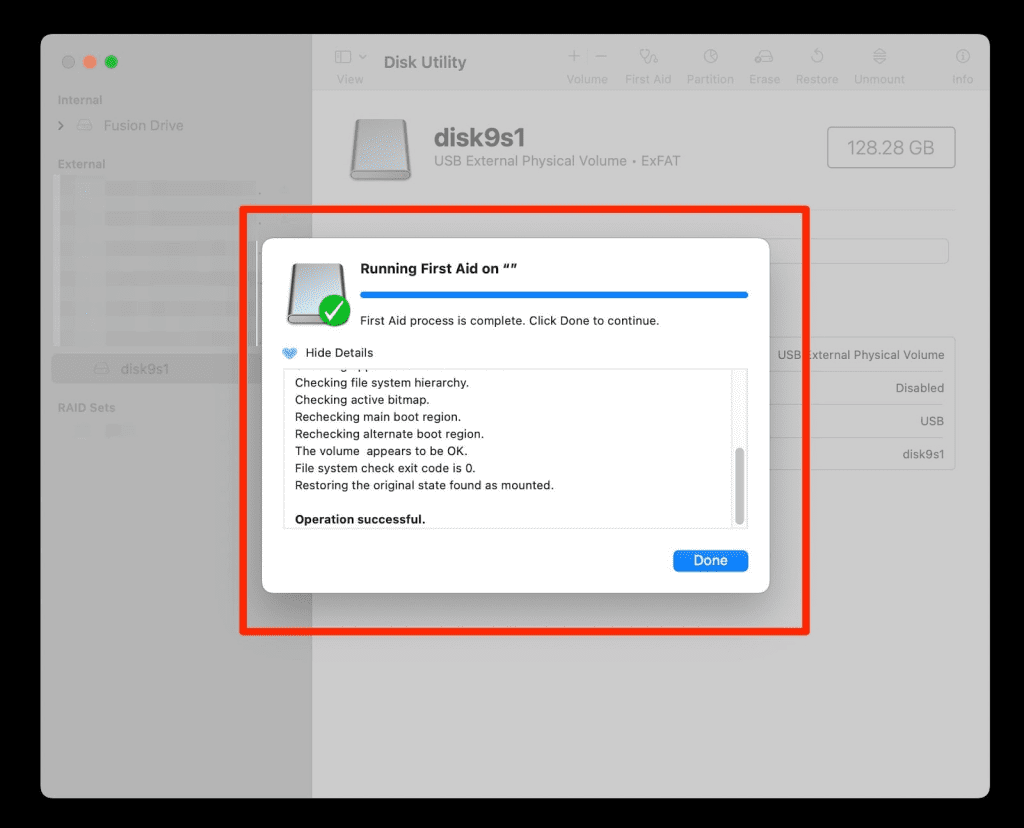
Step 3: When the process is complete, you will see Done, and the result will be displayed on your screen. If the Mac successfully clears up any errors with your CF card, there will be a green tick in the dialogue box. If not, you may need to try further steps like formatting.
Formatting CF card
Formatting the CF card can fix most disk-related issues. However, it will erase all the data on the card. Hence, it is essential to create a backup of the data before formatting the card. However, you can use Remo Recover Mac to restore your lost CF card data. And it’s always best to move the card from your CF card reader and format it using the camera or device you use. Different camera/device manufacturers have different methods to format cards in their devices, So I recommend you refer to the instructions that came with your camera.
To avoid the situations above, let’s look at the best way to handle your cards and how to run a quick backup using software already installed in your Mac OS.
Best Practices for Compact Flash Card Handling and Storage:
- Always format the card before use: Before using a new compact flash card, format it in the device you intend to use it in. This will ensure that the card is properly set up for your device.
- Avoid exposing the card to extreme temperatures: Compact flash cards are sensitive to extreme temperatures. Avoid exposing the card to temperatures outside the recommended range (usually between 0°C and 70°C).
- Handle the card with care: CF cards are delicate and can be easily damaged. Handle the card carefully and avoid touching the contact points or exposing the card to static electricity.
- Store the card in a protective case: When not in use, store the card in a protective case to prevent damage from scratches, dust, or other elements.
- Don't remove the card while the device is in use: Avoid removing the compact flash card while it's in use, as this can cause data corruption or loss.
- Regularly backup your data: It's important to regularly take a backup of your compact flash card photos to prevent data loss. You can use a backup program like Time Machine to automatically backup your data.
Creating a Backup using Time Machine:
1. Connect an external hard drive: Connect an external hard drive to your Mac
2. Open Time Machine: Open Time Machine from the System Preferences menu.
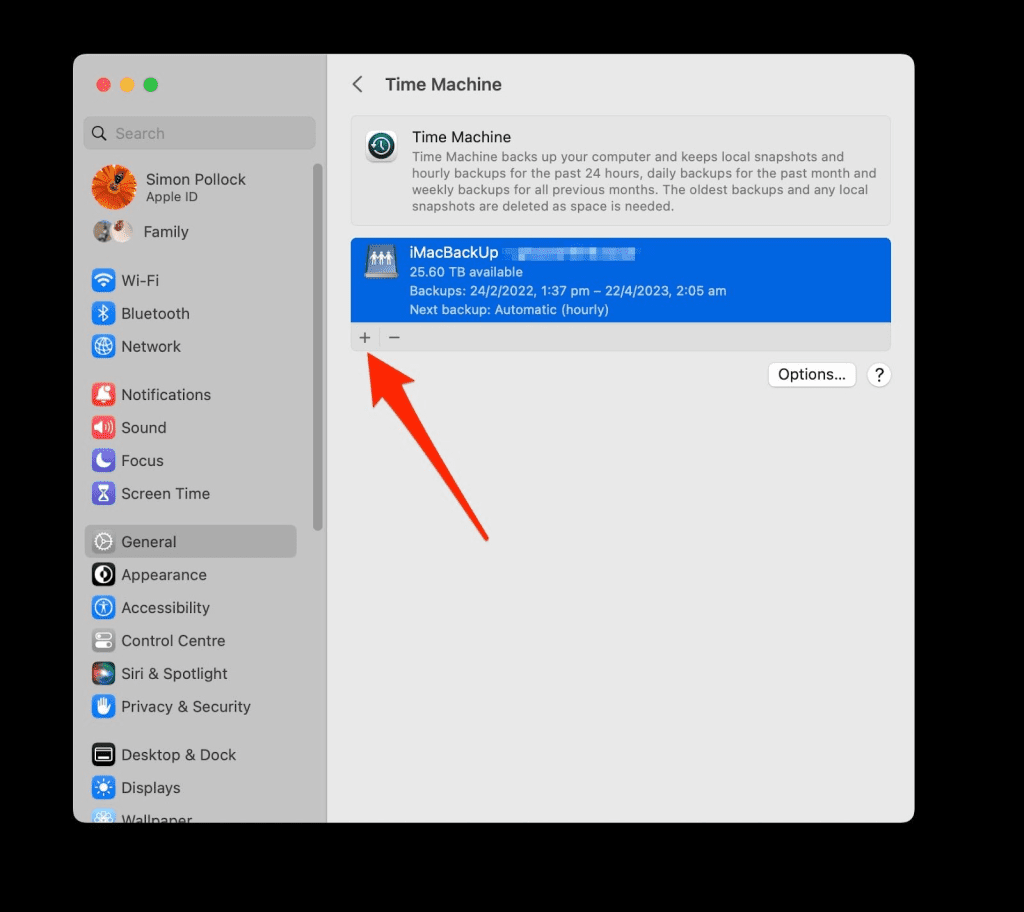
3. Select Backup Disk: Select the external hard drive as your backup disk.
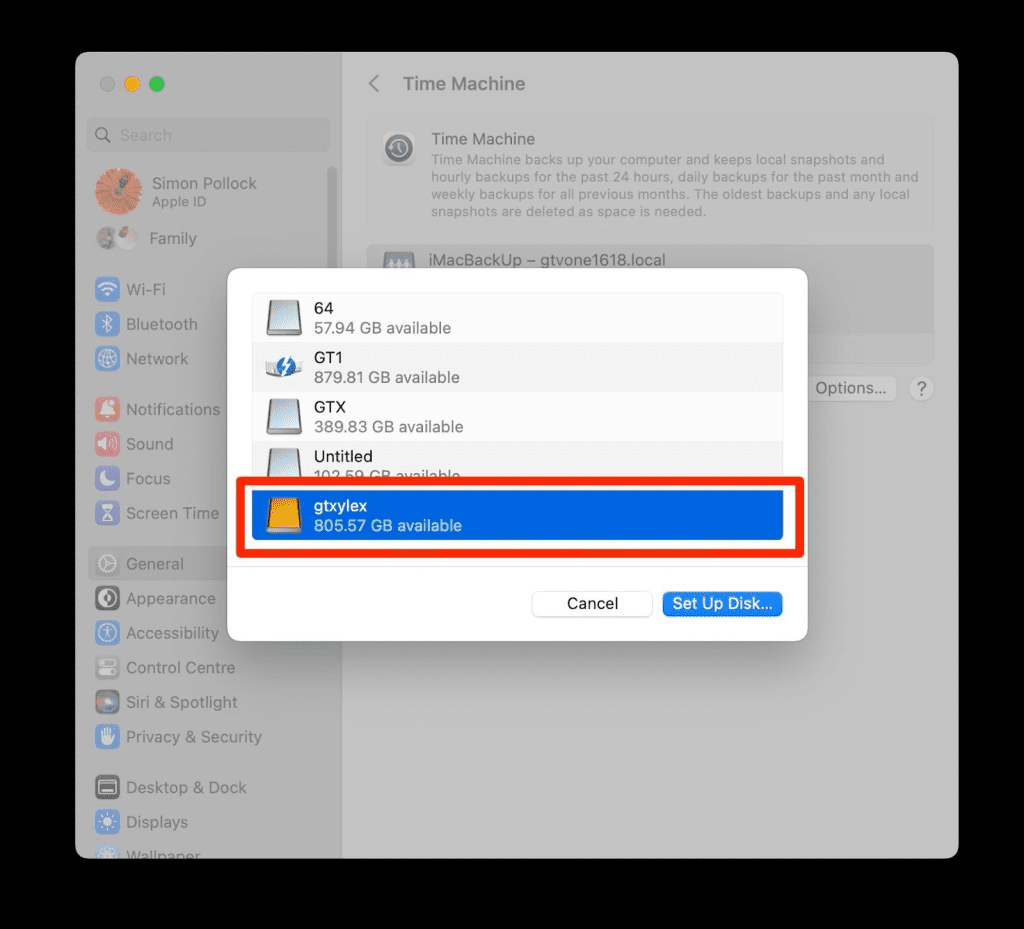
Note: Remember, any disk you choose as your destination for your CF card backup will need to be erased before it can be used as a backup disk, so make sure it’s a new disk or one with nothing on it that you need to keep! (double check!)
4. Choose Backup Options: Choose the backup options you want to use, such as whether to backup your entire system or just certain files and folders.
5. Start Backup: Click the Backup Now button to start the backup process.
6. Monitor the Backup Progress: You can monitor the backup progress in the Time Machine preferences window.
7. Disconnect the External Hard Drive: When the backup is complete, safely disconnect the external hard drive from your Mac.
By following these best practices for compact flash card handling and storage and regularly backing up your data using Time Machine, you can ensure your data is safe and secure.
Conclusion:
Data loss can be stressful; the most important thing to do is NOT to panic! Always be slow and steady, don’t plug, unplug and replug disks and drives repeatedly, hoping the disk will magically appear! Try the above-mentioned methods and successfully perform corrupted CF card recovery on your Mac. Good luck