Irrespective of how big your hard drive or SSD is, you are definitely going to run out of space one day. You might be trying to install an application or looking to store some important files, but your Windows 10 says You are running out of space on Local Disk (C:). You might try and delete some unwanted files and install that application for now.
However, remember you have solved this issue temporarily. This article has a permanent solution to resolve all your woes related to storage space and manage your hard drive space on Windows 10. Let’s look at the ways to make more storage space on your computer.
Use Disk Cleanup to make more space on your Windows 10
Using Disk Cleanup regularly can help you get rid of unwanted files from on your Windows computer. Follow the below mentioned methods to use Disk Cleanup to increase your storage space on your Windows computer:
- Click on Start button and in the search box type Disk Cleanup.
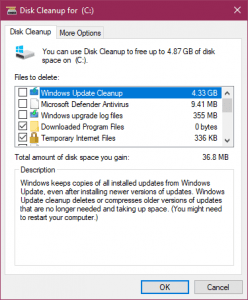
- Disk Cleanup will open up showing you the list of Files that can be deleted and the amount of storage space you can regain.
- Click on Clean System Files, here you will be prompted to select the drive you want to delete files if you have multiple partitions. If prompted select the drive and click on Ok
- Next you will be in Disk Cleanup window, where you will be having two tabs Disk Cleanup tab and More Options

- Under Disk Cleanup tab, select the type of files you want to delete and click on OK
- You will be prompted with a question Are you sure you want to permanently delete this files? Click on Delete Files
- Now go back to the drive from where you freed up space and refresh it you will have more space.
Although using Disk Cleanup is cool, you will have to make sure that you don’t end up losing important files. Yes, Disk Cleanup can erase files. You can read more on getting back files after Disk Cleanup here.
Make Use of Storage Sense to Free up Disk Space in Windows 10
Storage Sense is an advanced version of Disk Cleanup which is used to manage your storage space on Windows 10. When activated, the application automatically empties Recycle Bin, remove temporary files and even clear temporary application data. Follow the below mentioned methods to free up disk space on your Windows 10 using Storage Sense:
- Click on Start Menu and search Storage Settings
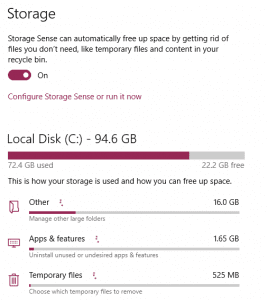
- Open Storage Settings, under Storage turn on Storage Sense

- Click on Configure and Run Storage Sense
- Choose how often you need Storage Sense to run and what type files needs to be deleted in order to make more space on your computer.
This way you can have Storage Sense always run in the background and have it manage your storage space.
Uninstall Applications that you no longer use
Uninstalling applications that you no longer use or applications that consume large storage space is easiest way to free up storage space on Windows 10. To uninstall a application, follow the below mentioned methods:
- Click on Start button and search Control Panel
- In Control Panel, go to Programs, click on Programs and Features

- Select a program that you no longer need and click on uninstall
Delete Unwanted Files from your Windows Computer
You might have stored files, photos, videos and other important files on your computer. However, there might be some unimportant files consuming your storage space. To identify and remove unwanted files from your PC follow the below mentioned steps:
- Go to This PC
- At the top right corner you will find Search This PC box
- Type size: huge and hit enter
- This will display all files with big file sizes now go to View menu, click on Sort by, and then select Size.
- Now that you have files listed in front of you, you can delete files that you no longer need.
C Drive is Full? Can’t Install Applications? Make Space for your C Drive Applications
C Drive in a Windows computer is one of the most valuable disk drive which hosts all the vital applications on your PC. However, when you C drive is full and you want to install and a new application you will be put into situation wondering which application to delete to install a new application.
Sometimes, you don’t want to delete any application. If you are one of those users who don’t want to delete any application and still want to install new apps on to your Windows, there is a solution for you.
If your PC has multiple partitions or disk drives, this got much simpler all you have to do is to change the file destination of the new application you are going to install.
If you do not have multiple disk drive, you can connect a USB or SD card and install Windows applications on SD card or any external storage.
To change where the new content is saved follow the below mentioned steps:
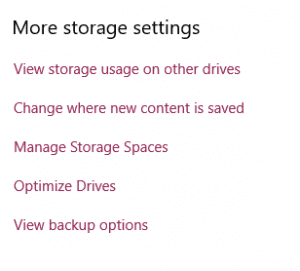
- Go to Storage Settings, scroll down and click on Change Where the new content is saved

- In the next screen you can click on where you want to install your application by clicking under New Apps will save to and select the other drive or a connected or USB or SD card
This way you can easily fix C drive is full issue and install applications on your computer. If you are getting C drive is full error due to the hard drive corruption, it is recommended that you repair and recover data from corrupted hard drive here.
Easily Find and Remove Duplicate Files that Consume More Space
In some cases there will be a lot of duplicate files on your PC which is highly impossible for you to delete manually. In those cases, it is recommended to make use of a professional Duplicate File Remover.
We recommend you to go with one of the tried and tested duplicated file remover software by Remo.
Using Remo Duplicate File Remover you can delete unwanted duplicate files on your Windows and free up space on your hard disk. The tool comes with an advanced scan engine that allows you smartly delete duplicates in a couple of clicks. Download now to remove duplicate files.
How to Remove Duplicate Files on Windows Using Remo?
To free up more space on your Windows by removing duplicates, download and install Remo Duplicate File Remover and follow the below mentioned steps:
- Launch Remo Duplicate File Remover Application and click on Scan Drives or Scan Folders

- Select the desired drive or folder from which you want to delete duplicate files and click on Scan
- After completion of the scanning process, you will be listed with all the duplicate files. You can use the filter to view them by file type
- Select the files that you want to delete and click on Delete
This is all it takes to delete duplicate files on your Windows using Remo. This tool comes in handy if you have duplicate photos or any other files on your Windows computer consuming your storage space.
Other ways to Free up disk space on your Windows Computer
Apart from the above mentioned methods, there are other common ways to free up disk space on your Windows 10. Following are some of the common ways to do it:
- Emptying your Recycle Bin
- Removing Files that are synced on to your One Drive or any other cloud storage from your PC
- Removing Temporary files
- Also by making smart choices of backing up data on to cloud storages
