Summary: In this article various steps to transfer your Microsoft office from one computer to another, there as two sections talking about "Transfer Office 2010, Office 2013 with a License" and "Transfer Office 365, 2016 or 2019 without license"
Transferring Microsoft Office from one computer to another computer is no more a tedious job. After receiving huge feedback from the users in 2013, where a lot of users were requesting rights to transfer Microsoft Office to another computer, Microsoft finally agreed to allow users to have their Microsoft Office transferred to a new computer. There are more than one ways to transfer Microsoft Office and you can learn about all of them with the help of this article.
Source: souq.com
Note: Before you start with the process of transferring Microsoft Office to a new computer, you should deactivate your Office account and uninstall Microsoft Office from your old computer.
Table of Contents:
- Important Points to Consider before Moving Office to Another Computer
- Three conditions should be met before you transfer your Office onto another computer
- How to Transfer Office 2010, Office 2013 with a License?
- How to Transfer Office 365, 2016 or 2019 to a New Computer?
- Transfer office to a new computer with Office 365 Subscription
If you want to transfer MS Office to another computer for older versions like Office 2010 or 2013, then you need to know that these versions come with license tags that have specific restrictions on transfers or installations perse.
Whereas, when you consider newer versions such as 2016, 2019, and Office 365, the licensing is associated with the client’s email; therefore, in this article, we will talk about the step-by-step procedure to accomplish this task with the variations discussed above.
To check what type of license tag you have for Office 2010 or 2013, follow the steps below, but if you’re using Office 2016, 2019, or Office 365, skip to the next section.
Note: If you accidentally lose any of your Microsoft Office Files, then follow this article to discover a sure-shot way to recover Microsoft Office Files.
Important Points to Consider Before Moving Office to Another Computer
1. The License Type.
Microsoft Office comes with different License tags, which differ from user to user, and every specific License type has some or other restrictions; therefore, first, it is always mandatory to know the License type of your Office installation.
2. Right to Transfer the License.
As you know, you need to have a proper License to transfer Office to a new PC. The Licenses that allow the transfer are FPP, PKC, HUP, ESD, and POSA.
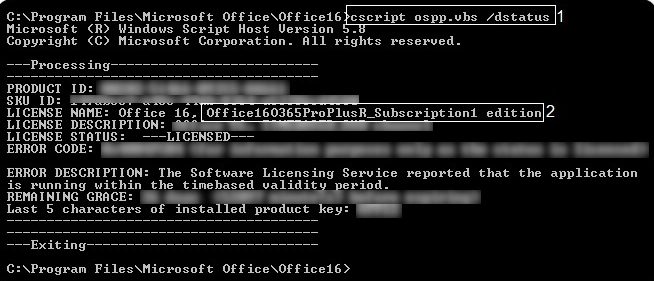
You can check the license of your MS Office using the below steps:
- Goto Search button on the Windows panel.
- Type cmd and open up the command prompt.

- Type cd\ and press enter. In the next line, type cd and put the path of your Office location, then press enter.

- The licenses will pop up in a few seconds; then, you can proceed with the installation if you see Retail or FPP, PKC, etc.
3. Number of Installations provided with the License
As mentioned above, only specific licenses will allow the transfer; there’s a limit on the number of transfers and installations, so it is always better to check the number of installations provided with the license.
In the next steps, you must check whether your license allows you to transfer Office from one computer to another multiple times. License with tags such as Retail or FPP PKC, etc. will allow Office 2010 & 2013 to transfer; for the rest of the Office License types, the installation is restrained to end with the hardware & transferring the Office installation won’t be possible.
Three conditions should be met before you transfer your Office onto another computer:
- Microsoft product, which is paid, comes with a 25-character product key required to activate the software.
- To transfer the Office onto a different PC, the License must support transfer.
- Must have Office installation media (disk or file) with the matching Product Key.
Note: Above conditions will not apply to Office 365 & 2016, as for them the License association comes with the client’s email and not with the hardware.
How to Transfer Office 2010, Office 2013 with a License?
If the license type of your Office allows you to transfer and reinstall the app to another computer, then to transfer Office 365, Office 2010, or Office 2013 to another PC with a license provided, follow the steps stated below:
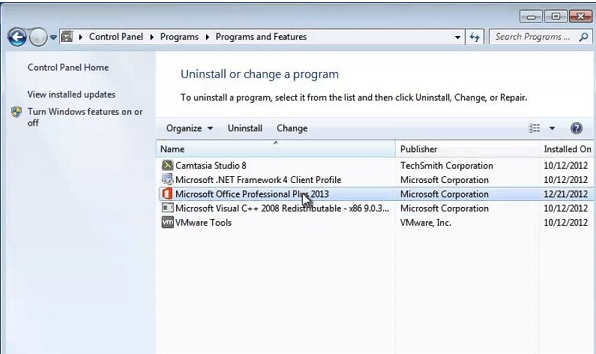
- Firstly, you need to uninstall the application from your old computer. Goto Control Panel>Program features>Select MS Office 2010 or 2013. Then, right-click on the app to uninstall it.

- Now, you need to check whether your Office is running on a trial version, if it is, then you need to uninstall the application completely.
Note: If you fail to uninstall the application properly then you may end up facing issues.
- Then, on to the new computer, set up the installation, install the application from the CD or any drive, and enter the license key given with it.
- After successfully installing the Office App, Go to Account and activate the product, click on the change product key, and add it there, and you are good to go; you have successfully transferred Office to another PC.
Note: If the installation did not happen and you get an error message which says too many installations or the activation could complete then you need to contact customer care and raise the concern.
Now, let me talk about how the procedure works for Office 2016, Office 2019, and Office 365 subscriptions in the next section below:
How to Transfer Office 365, 2016 or 2019, to a New Computer?
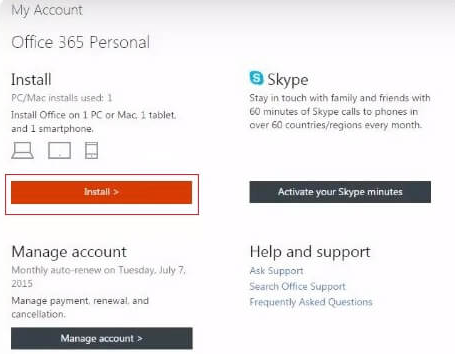
- Open Microsoft Office and go to the My Account page on the web.
- Where the list of all the products you own will be shown, then move to the Install section and click on the Install button.

- Then click on the Settings option and select Deactivate Install.
- After successfully deactivating the License. Open Control Panel > Programs&Features > Uninstall Office, which is linked with the License.
- Then, on your new computer, go to the web browser, log in to MS Office, and Install the Office on the computer. Then, a setup.exe file would start to download.
- After downloading the setup file, wait a few seconds for the process to complete.
- Now, you can successfully move Microsoft Office 365, 2016, or 2019 to your new computer. Cheers!
Transfer Office To Another Computer with Office 365 Subscription
Applies to: Microsoft Office subscription versions
If you've got a Microsoft Office subscription, it would have been linked to your account. All you need to do is deactivate your Office 365 subscription from your first computer, install it on your new system, and activate the subscription there.
Step 1. Deactivate the Subscription on Your Old Computer/Laptop
First, unlink your previous computer with your Office 365 subscription.
Go to the Microsoft account website. Launch a web browser on the old computer that currently has Microsoft Office on it.
Log in to the Microsoft Store with your MS Account.
Click "Install" > Click "Deactivate Install" under the Installed column > Click "Deactivate."
Then, you can go to "Control Panel" > "Add or Remove a Program" and uninstall MS Office from your first computer.
Step 2. Install MS Office on the New Computer/Laptop
Tip: Download and install the compatible MS Office version matching your product key.
Go to the Microsoft account website again on your new computer and log into the Microsoft Store with your MS account.
Click Install to download the setup file, and click on it when it finishes downloading.
Click Run on the pop-up window and click Next to continue.
Click Sign In to verify with your MS account, and follow the onscreen instructions to finish installing MS Office on your new computer.
Step 3. Authenticate the Office 365/2016 Subscription
To complete the setup, enter your product key to be linked to your account. If you have saved the product key in advance, activate it. If no, follow to locate the product key supplied with your copy of Microsoft Office.
- The product key can be found inside the DVD case for a boxed version.
- The product key is sent together with the order confirmation email for a purchased digital version.
Moreover, you can also check your Office product key by visiting this Microsoft account and entering your MS account. Finally, click the View product key to overview your 25-character keys.
After getting the product key, run any Microsoft Office application - Word or Excel, etc., click on Activate, and type in your 25-character product key. Sign in with your MS account if necessary.
Since you have easily transferred Microsoft Office 365, 2010, 2013, 2016, and 2019, what happens to data on applications installed within MS Office such as Word, Skype, Excel, or Outlook?
Yes, the data or the files created using MS Office applications have to be transferred, especially if you want to continue working on the new computer, while you can easily copy the Office files on the external hard drive and import them back onto the new computer, Outlook files are a bit tricky to export and move across, as the transferred Outlook data cannot be accessed directly using the Outlook on the new computer. You may use the Outlook Import/Export feature or a professional Outlook migration tool to start using Outlook data on the new computer.
There is only one professional tool that can transfer Outlook data files safely and effortlessly with all attributes such as rules, emails, notes, calendars, etc., called Remo Outlook Backup and Migrate; the tool can also take a necessary backup, and this backup can be used in an emergency to restore any lost data.
Remo Outlook Backup and Migrate is an exclusively designed tool to move, transfer, and back all your Outlook data to a New Computer, a New Windows version, and as well as a new Operating System; it also comes with 25GB of free cloud storage to store your Outlook data files as well as personal files and move them to any system when necessary.
It provides the option of automated backup; you can schedule the time and date to automatically back up Outlook data files and even password-protect your data files to maintain them securely.
Conclusion
Follow the steps and procedures outlined in this article to transfer Microsoft Office to a new computer effortlessly. Share your experiences or any questions you have in the comment section below.
Frequently Asked Questions
No, Microsoft follows ONE license/product key = ONE install at a time, restricting you from using the product keys on different computers.
Students and educators at eligible institutions can sign up for Office 365 Education for free.
You can uninstall the program using the command prompt to remove the MS Office license from a computer.
I dutifully uninstalled, from the old PC, my ‘Retail’ version of Office14. That, of course, deleted the relevant setup.exe though I doubt it would have got me beyond the next step. Given internet vs ‘phone, I chose internet, only to be told that I needed to use the ‘phone and, guess what, I was told that that route is no longer available. Without the installation CD, there seems no way out of this. Please help.!
Hi Derek, as mentioned in the article, it is very necessary to have an installation CD or a drive, for you to make the transfer with the Microsoft Office version 2010. Please find the installation CD drive and try the process again.
Thank you , i followed the steps and finally move my office 2021 to the new computer successfully, btw, i got the office 2021 from keyingo store , so far so good
Hello, Kathari Hecon! Thank you for your kind words. We are happy to know that our article has helped you transfer your MS-Office to new computer!