USB flash drives are quite easily susceptible to lose. Flash drives go through a lot of mishaps, such as improperly disconnecting USB drives without ejecting, accidentally formatting, and finally corruption of USB flash drives. These are some complicated data loss scenarios.
The below graph depicts some of the general statistics for data loss based on the survey from the Kroll Ontrack, CBL Data Recovery Technology, and Infosec Institutes States.
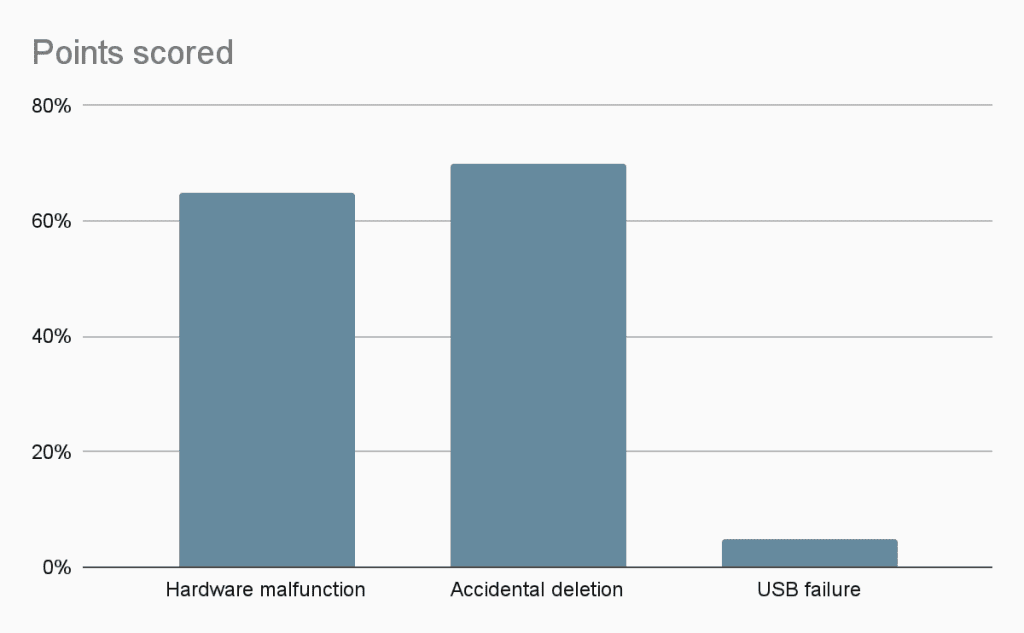
As per the above statistics from the prestigious institutions like Kroll Ontrack, CBL Data Recovery Technology, and Infosec Institutes States, 65% of the statistics shows people lose their data due to accidental deletion.
If you have encountered a similar issue then don't worry. This article is for you. In this article we will discuss how to recover data from using Time Machine. In case you have not taken backup then don't worry you can still recover the data. Stay tuned to know how to recover data from pen drive on Mac without Backup.
Where do Deleted USB files Go on Mac?
When a file is deleted it is not completely erased but, it is marked as deleted. Space occupied by the deleted files is made ready to be overwritten with new data. Which makes files invisible and inaccessible. Hence in such situations, it is recommended not to add any data on the pen drive if you have encountered data loss.
How Can I Recover Deleted Files from my Flash Drive on Mac?
Try the following methods to restore the deleted files from the USB flash drive.
Method 1: Check in Trash Bin
You can recover deleted files from USB flash drive on Mac computer by first checking from the Trash Bin.
- To check for the deleted files go to the Trash Bin.
- Check for deleted or lost files and select the files which you want to recover.
- Right-click on it and select the Put Back option.

| Advantage | Disadvantage |
| The solution is easy and hassle free. | It will be challenging to recover the data if you've removed/erased everything from the Trash bin. |
Note: The following methods have been tried and tested in the Remo Research Lab. Under the Test Environment as follows.
- Storage Device: Kingston USB Drive
- Storage Size: 8 GB
- Data Loss Scenario: Permanently deleted files
- Storage Device File System: exFAT
- Data Recovery Software: Remo Recover Mac
- Time Taken for the Recovery: 25 minutes on M1 processor and 30 minutes on Intel processor.
- Processor: M1 and Intel.
Test Case Scenario:
Scenario: Can I recover my data from the USB device on which I deleted the photos and emptied Trash?
Verdict: Yes, you can recover the data from the USB drive on which you deleted photos and emptied the Trash bin using Remo Recover Mac. We did try to recover the permanently deleted photos like .jpg, .gif, .png, .bmp, etc., on an 8 GB flash drive - it took 25 mins on an M1(processor) machine and the computer resources that were used while scanning were CPU. If the Intel(processor) machine is used then it might take 30 mins for file recovery from your USB drive on Mac.
Method 2: Recover Deleted Data using Remo Recover Mac
In case you were not able to access the deleted files from the Trash then we recommend you make use of USB recovery software for Mac since it is impossible to manually access the storage sectors of a Pen drive.
Remo Recover Mac is the most efficient tool trusted by professionals, built with a simple interface which makes the recovery process hassle-free. It is a prominent tool that can recover data from flash drive, SD card, SSD, hard drive, pendrive, etc., with more than 10 million downloads across the globe to this date. Why wait? Go ahead by downloading the tool and getting it started with the recovery process.
Source: Trustpilot
Steps to Recover Lost Files from Flash Drive on Mac
Download now and Install the Remo Recover Mac Software on your computer. Connect the USB flash drive/Pen drive to your Mac computer, launch the software, and follow the below mentioned steps.
Note: Since the tool is even compatible with the latest Mac Ventura 13.2.1 OS and works flawlessly with all file systems such as APFS, HFS+, HFS, ExFAT and even recovering NTFS formatted drives on MAC, you will not be facing any compatibility issues at all.
- From the home screen, select the Recover Deleted Files / Recover Lost Files option according to the requirement.
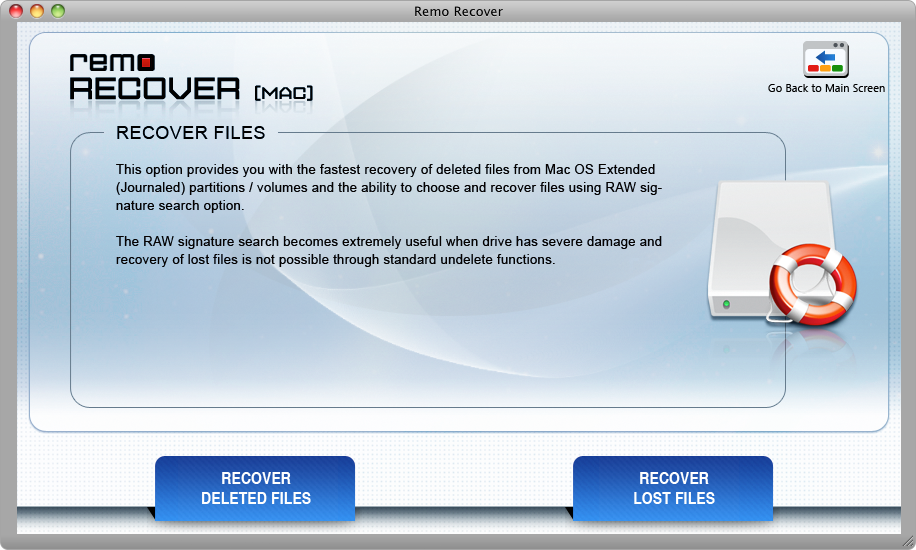
- The software will list the drives available on your Mac.

- Now select the flash drive or pen drive with deleted files and click on next to Scan the drive. After scanning the USB flash drive, the software will list the files that are deleted from the USB flash drive.

- Select the files which you want to restore and click on the Save option to get back the deleted files from the USB flash drive.
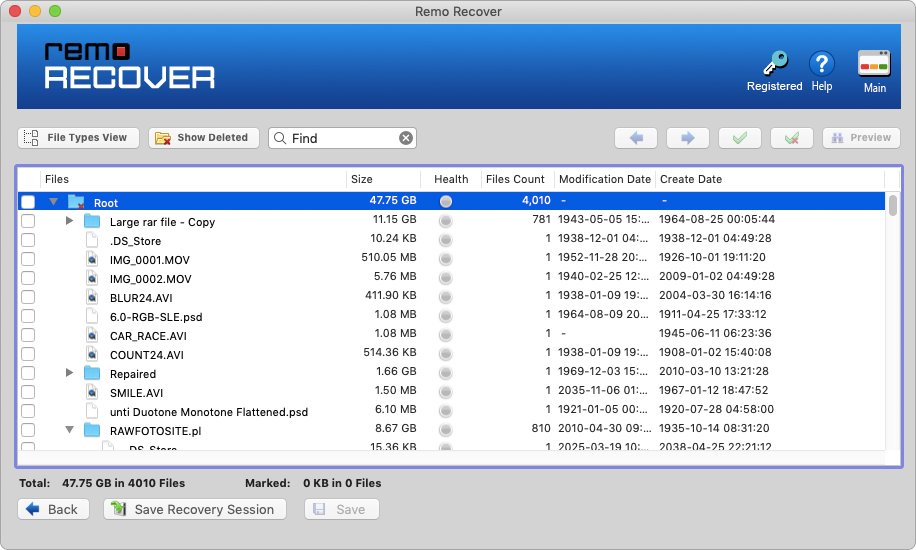
- Finally, mention the volume location on Mac to store the recovered files.
| Advantage | Disadvantage |
| This method will help you get back the data even after you have emptied the Trash or if the files are permanently deleted. | You will not be able to get back the deleted files if your drive is overwritten. |
Note: You can also use this tool to recover the data from inevitable data loss scenarios such as recovering data lost from a Mac guest account. Since the Mac guest user account deletes the data as soon as you log out from the account
Method 3: Check for any Hidden Trash
If you are wondering why the external storage device does not have the Trash. However, the Trash will exist on the external storage device but it will be hidden. By following the below steps you can unhide the Trash on external storage devices.
If you are looking for USB Trash on Mac on Sierra and a higher version then follow the steps:
- Go to Finder by clicking on Shift + Command + .
- Now you will be able to see the hidden Folder called .Trashes and see if you can see the deleted or hidden files.
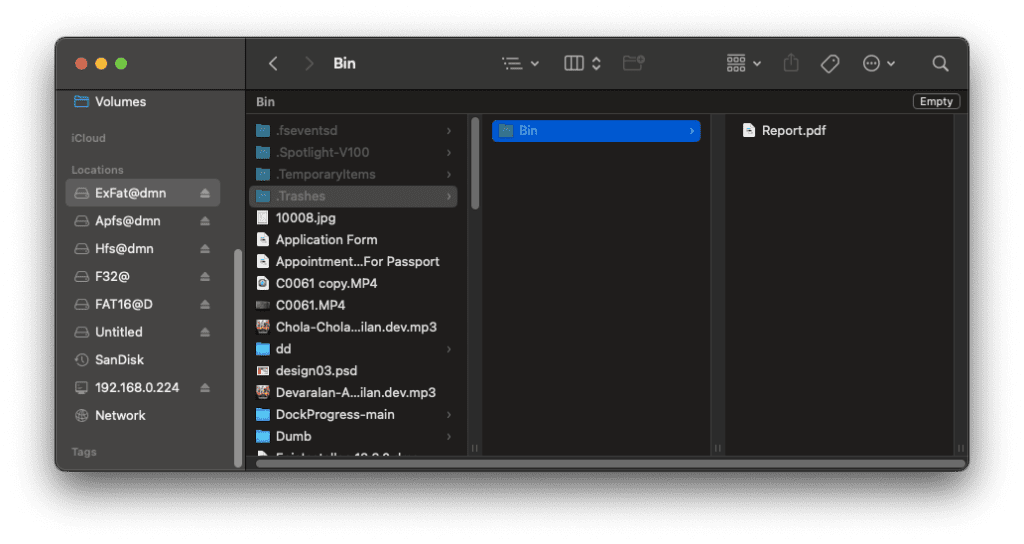
- You can also try to copy and paste the files on other storage devices or the Mac.
If you are looking for USB trash on Mac on an older version than Sierra then follow the steps:
- Go to the Terminal Application and type the following commands: defaults write com.apple.finder AppleShowAllFiles TRUE and hit Enter.

- killall Finder and hit Enter.
Note: If you want to again hide the file defaults write com.apple.finder AppleShowAllFiles FALSE and hit Enter.
| Advantage | Disadvantage |
| This method will help you recover files from the hidden Trash bin. | In case you have deleted the files using the Command-delete option then this method will not be helpful for you. |
Four Most Important Tips to Avoid Data Loss On USB Flash Drive
- Maintain backup of all your important files saved on the USB drive
- Avoid Improper methods to eject the USB drive.
- It is better to avoid directly working files on a USB drive. Always try to edit the files on your Mac and later save them to a USB drive.
- Avoid connecting your USB drive to virus-infected devices to avoid USB file corruption.
Frequently Asked Questions
Yes, there is a Trash Bin on a Flash drive, but not the general Trash Bin of an internal storage device. Usually, for the external storage device the Mac OS will create a hidden trash folder called .Trashes. In the above section of the article, we have discussed how to access .Trashes on macOS Sierra above and below OS versions.
If you have come across the accidental deletion then first check the .Trashes. In case you were not able to find the deleted files then you can try recovering the lost files via Time Machine.
To do so follow the steps below to recover deleted files using Time Machine.
1. Connect the storage device containing the Time Machine Backup to your Mac.
2. Go to the Finder window and by clicking on the Time Machine icon launch the Time Machine.
3. Now search through the available backup and select the items you want to save then click on the Restore option.
To fix a damaged USB Flash drive on Mac follow the steps below:
1. Go to Disk Utility and select the View tab and then navigate to the Show All Devices option.
2. Click on the First Aid button to fix the corrupted drive and then click on the Run option and then select First Aid and lastly click on the Done option.
To show hidden files on Mac follow the steps below to unhide the files on Pen drive on macOS Sierra and above versions:
1. Go to Finder by clicking on Shift + Command + .
2. Now you will be able to see the hidden Folder called .Trashes and see if you can see the deleted or hidden files.
3. You can also try to copy and paste the files on other storage devices or the Mac.
There might be a few reasons your USB drive might not be getting recognized on Mac.
1. Check if you have connected your Mac properly or not, else connect the USB to the other USB port
2. There might be debris stuck to your USB drive.
3. Your USB drive may not be compatible with the file system of your Mac.
4. See if your USB drive is password protected.