It is known that a flash drive or USB drive is used as a removable disk in the computer. Mainly used to transfer data between two computer devices. It can also be added to your local drives and can be used as a partition. Before that let us consider scenarios in which you might want to convert a USB drive to a local disk.
I have a Sandisk Cruzer Switch 8GB Pendrive. I want to change it to Local Disk. Can any one please help me to change the USB drive to a local disk.
Yes, in this article, we will help you to convert the USB drive to the local disk but before heading for the conversion you need to understand the reasons to convert your USB drive to local disk.
Reasons to convert USB Drive to a Local Disk
Scenario 1: Sometimes it is required to use your USB drive as a local disk to install an operating system or if you are running out of memory maybe because there are large files of programs saved in your local disk. Generally, you cannot install OS on a removable disk.
Hence, if your computer is running low on internal storage space, converting USB to a local disk will help you save the storage space. Additionally, converting the external drive to local will also allow you to carry a personal computer on the go. So, you can just plug and play whenever it is required.
Scenario 2: Generally, Windows only supports multiple partitions for hard disk drives that are identified as local. The only way you can create a partition on a USB drive is by converting the USB drive to a local disk.
Important Note: Creating multiple partitions on USB flash drives might be one of the reasons why your USB is not showing full capacity. If you have faced the same issue. Then we recommend you go through this article to find out how to restore the USB drive back to full capacity.
Since, recently most of the storage drives provide storage space of 1TB and above, converting USB to local disk will allow you to create partitions. A better way to organize your vast amounts of data.
There are various ways to convert a USB flash drive as the local disk; here I am listing one of the best and most convenient methods of converting USB to a local drive:
Note: Before performing these steps make sure you create a backup of your flash drive data else, you may lose your files. In case that happens, immediately stop using the drive and recover lost files from the flash drive using Remo Recover Software.
Method to Convert USB flash drive to Local Disk:
- Insert the flash drive into the USB port of Windows (Windows 11, 10, Windows 8, 8.1, Windows 7, Vista, XP, Windows Server 2003 and 2008) computer.
- Make sure that your USB drivers are updated and installed. If you are using Windows & and the latest versions, by default, your OS will keep the drivers updated.
- Sometimes you may need to format the drive to avoid any kind of errors. But don't forget to create a backup before you format the USB drive.
- Unfortunately, if you forgot to create a backup of any of the files and lost them in formatting, you can use an efficient flash drive recovery software to restore lost files...
- Then you have to download the USB_LocalDisk.zip and extract it. You can download the zip file here.
- From the USB LocalDisk folder right click on cfadisk.inf and open it using Notepad or Notepad ++ or text editor
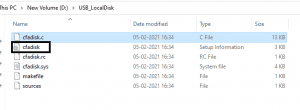
- Then go to line 26 of the .inf file
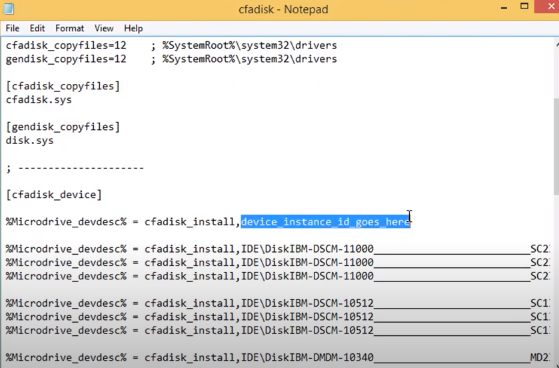
Note: We are going to edit the section named “device_instance_id_goes_here”. It is better to keep this file open.
- From the desktop, click Start > Run and then type “devmgmt.msc” and press OK to open device manager.

Note: Make sure you are logged in as an administrator
- Find your USB stick under the Disk drives tab and right-click then select Properties.
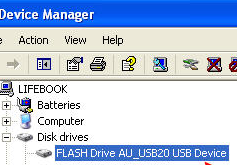
- Then go to Hardware Tab and select the Removable disk. Click on Properties.
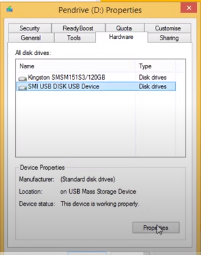
- Then open the Details tab and select Device description. Click on the Device instance path from the list.

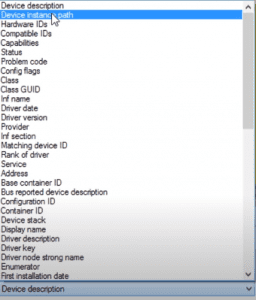
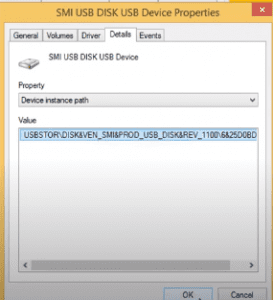
- Select the Value and take the help of the Ctrl + C key combination to copy the Device instance path.
- Go ahead and again open the .inffile i.e. cfadisk. Here you will insert the drive code and Save the file.
- Locate the text which says “device_instance_id_goes_here” should be around line 26. Then paste the drive code you have using the paste option or by Ctrl + V.
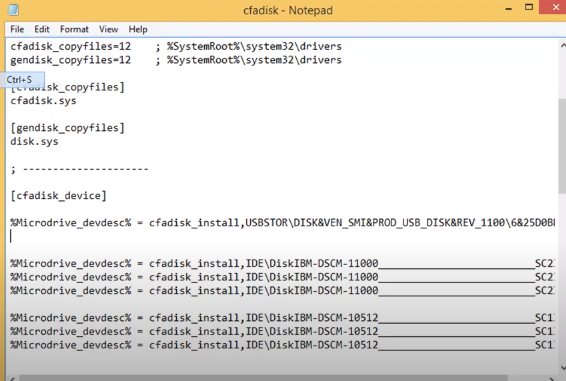
- Hit Save button (So now we have created an updated driver for the device, so it will now read as a Local Disk. Now we just need to update the driver itself)
- Go to Start > and type Disk Management. Under disk management select the tab below saying Removable Disk. Right-click on it and click on Properties.
- Go to the Driver tab and select on “Update Driver” option and select Browse for Driver Software on our computer. Then click on Let me pick from a list of device drivers on my computer.

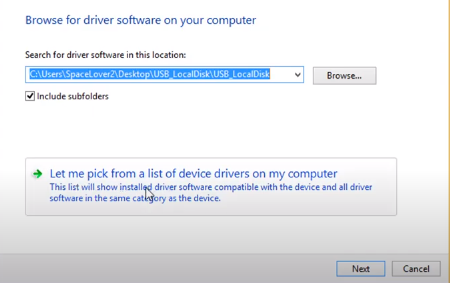
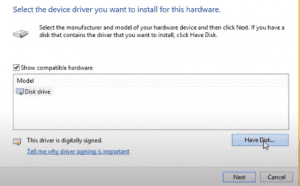
- Click on Have disk>Next> Browse.
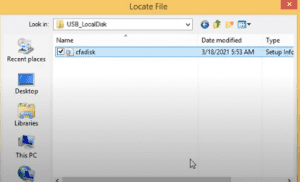
- Browse to your recently edited cfadisk.inf file location under USB_LocalDisk folder. Then click on Open.
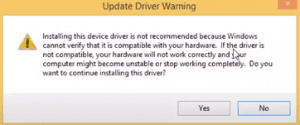
- Hit OK>Next and then click on Yes on the below-mentioned warning.
- In the next prompt of the Windows Security window click on Install this driver software anyway.
- Once it shows Windows has successfully updated your driver software you can click on Close.
Alternative Method:
In most cases, a flash drive or USB drive is used as a detachable disk in your computer. It is mostly used to transport data between two computers. It can, however, be added to your local drives and utilised as a hard drive partition. This is useful if you are running out of hard disk space. The flash drive, like your hard disk, can be partitioned.
Insert the USB flash drive into your computer's USB drive. When you insert the drive, it appears in the "Devices in Removable Storage" section of "My Computer."
- Install Notepad++ with the default options. You can also use various text editors that display line numbers.
- Extract the contents of "USB_LocalDisk.zip" to the desktop.
- Navigate to the "cfadisk.ini" file in the "USB_LocalDisk" folder. Open the file with Notepad++ by right-clicking it.
- To open the Device Manager, go to "Start->Run," type "devmgmt.msc," and press the "OK" button. Then, in the "Disk Drives" section, double-click your USB flash drive.
- In the "USB Device Properties" window, choose the "Details" tab and then select the property "Device Instance Path." Take note of the text that appears in the "Value" field.
- Click "Have Disk," then browse to and pick "cfadisk.ini". After that, click "Next" to update the USB driver. Shut the window.
- Open "My Computer" and look for your flash drive in the local hard drives section.
With these steps, you can easily convert your flash drive into a local disk. Again open Disk Management and now you will see the removable disk as a local drive.
However, once you are done with the above steps, you can not only install the operating system on the USB drive but it will also help you when your system is running out of memory. Make sure your USB has sufficient memory before performing these options.
You can partition the USB Flash Drive directly in Windows 10
NOTE: If you have some data stored in the Drive then take a backup before you perform the following steps.
Steps to follow:
- Insert the thumb drive into the USB port of the Windows Computer.
- Open File Explorer and right-click on the USB Drive and click on Format
- Then in the next window change the File System type from exFAT to NTFS.
- Give a name to the Volume label and Click on Start.
- Once the format is complete, click on Close.
- Click on the Windows button and go to Disk Management.

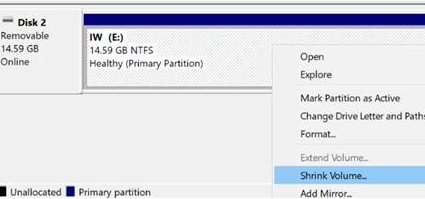
- In the Disk Management window click on the name of the drive that is the volume name. Then right-click on it and select Shrink Volume.
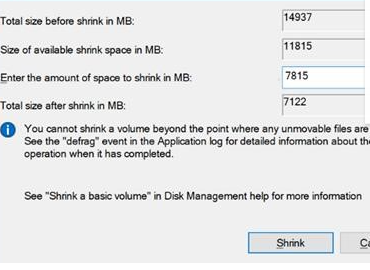
- Then in the next window, you can choose the volume size and click on Shrink.
- Right-click on the unallocated space and select New Simple Volume and click on Next. Give a name to the new volume and again click Next > Finish.

Conclusion:
By this time, we hope that you were able to convert USB Flash Drive into the Hard drive. You can convert a USB to a hard drive using Disk Management as mentioned in the article. If you have any queries please drop a query in the comment section below.
Thank u very much
Hello!! Thankyou Very much. It really works. I was trying since long to make my Pendrive a local disk using softwares but it didnt help. It just makes PD a NTFS drive but didnt show it in local disks. This trick worked. Thank you again
I thank John Harris for creating this brilliant article about “How to Convert USB Flash Drive to Local Disk”. The reason why I needed this, because I am currently using a laptop and it’s low on disk space. So I bought a USB Drive and hopefully convert it into a Local Disk Drive. Once again thanks for this helpful article.
Your help and advice will be very much appreciated. Thanks!!
thank you for your help
thanks so much
Good article, but there is no download link for the tool…
is there a 64-bit version of the tool?
does not work for me,
it says: “The folder you specified doesn’t contain a compatible software driver for your device. If the folder contains a driver, make sure it is designed to work with Windows for c64-based systems.”
Hi Masaru, please make sure that your USB drivers are updated and installed. If they’re not updated by default, please try installing the latest drivers which are compatible with the 64-bit version, and carry out the procedure.
Thank you so much. I could only see my flash drive in virtualbox as a volume. This worked great.
Hey Anthony.! We are happy to know the methods worked for you. Thank you for leaving your kind words.