Moving Outlook to a new computer goes beyond simple copying and pasting of files. It involves the transfer of complex configurations, email accounts, contacts, calendars, and customized settings. To ensure a smooth transition, it is crucial to follow the correct steps for transferring Outlook to the new computer. Let me assist you in guiding you through this process.
Prerequisites for a seamless transfer of Outlook to another computer or another version of Outlook:
- A copy of Outlook is installed on the new computer.
- Backup of Outlook data file (.pst file) from an old computer
- Backup of Outlook data file (.pst file) if you are moving from an old version of Outlook
How do I move Outlook to a new computer?
There are 4 ways to move Outlook from one computer to another:
- Using the Export and Import Wizard
- Manually copying the Outlook data file
- Using a Professional Outlook Migration Software
- Converting OST to PST ( for those users with OST files and who have no connection to Exchange Servers)
Quick Guide to Moving Outlook to New Computer
Step 1: Export Outlook data from the old computer using the Export and Import Feature.
Step 2: Choose "Outlook Data File (.pst)" as the file type and export the Outlook data.
Step 3: Transfer the exported .pst file to your new computer using a USB drive or external hard drive.
Step 4: On your new computer, import the Outlook data file using Import from another program or file feature.
Step 5: Look for your Outlook data, like emails, contacts, calendars, and other Outlook items. If you find them on your new computer, you have successfully moved them.
When considering the task of moving Outlook data to a new computer, it's important to weigh the advantages and disadvantages of different methods. While manual transfer is a common approach, it's important to understand the potential drawbacks involved.
Drawing from my first-hand experience, here are some key points to consider before opting to manually transfer Outlook data to a new computer:
- Time-consuming process: Manually moving Outlook data can be a time-consuming endeavor, particularly if you have a substantial amount of data or complicated folder structures within Outlook.
- Potential for data loss or errors: During the manual transfer, there is an increased risk of human errors, such as unintentionally selecting the wrong folders or overlooking crucial data. These mistakes can lead to data loss or an incomplete migration, which requires additional time to rectify.
- Complex settings and configurations: Manually transferring settings, email account configurations, rules, and other personalized options can be complex and error-prone. It may require meticulous attention to detail and subsequent manual reconfiguration on the new computer.
- Limited migration capabilities: Manual methods may not provide the same level of flexibility and comprehensive migration options available through specialized software. These software solutions often offer features like selective migration, scheduled backups, compression, etc. which is impossible while moving Outlook data manually.
By considering these points, you can make an informed decision on the best approach for transferring Outlook data to your new computer. While manual transfer may suffice for simpler cases, unlock the advantages of dedicated Outlook migration software like Remo Outlook Backup and Migrate. Streamline the process, minimize risks, and embrace a comprehensive solution for effortless migration.
Transfer Outlook to New Computer Using Remo Outlook Migration Software
Having personally experienced the complexities of transferring Outlook to a new computer, I understand the frustrations involved. However, I discovered that the process doesn't have to be as daunting as it seems.
- You don’t need to convert your OST file to a PST file in order to have your Outlook data moved to another computer.
- You don’t have to manually select the files and folders by dissecting the PST file (considering you know the location of the PST file).
These complications of transferring Outlook data are no longer inevitable as a result of the automatic tool to transfer Outlook.
All you need to do to move your Outlook to a new computer is make use of Outlook Migration Software. This Outlook Migration Tool by Remo helps you move your Outlook to a new computer without having to do anything more than a few clicks.
This tool by Remo not only helps you transfer Outlook but also assists in backing up Outlook data. Irrespective of any data loss scenario, with Remo’s smart backup options, you can be sure of never losing your Outlook data.
Using the Remo Outlook Migration tool, you can even migrate your Outlook profile to Office 365, Outlook 2019, Outlook 2016, Outlook 2013, Outlook 2010, Outlook 2007, etc.
Let’s quickly dive straight away into the process of migrating Outlook to a new computer with Remo.
Outlook Backup and Migrate tool has a 4.5-star rating on trusted platforms like Trustpilot. We have mentioned some of the note-worthy reviews to help you decide better.
Mark from Holland- 1 review- NL- Rated 5 out of 5 stars
Outlook on the new PC created a profile and kept using that after migration...
Chat to support when I wanted to help me directly with my Outlook migration issue. All working fine. The cause was very logical and my own fault actually. Happy camper here.
Date of experience: November 25, 2022.
Source: Trustpilot.
Pamela- 3 reviews- CR- Rated 5 out of 5 stars
The Outlook migration from PC to PC…
The Outlook migration from PC to PC worked as promised. When I ran into a minor hiccup regarding permissions on my new system, Support were available to quickly walk me through the solution. Very happy with the end result and will continue to use the product for Outlook data backups. Great team of professionals in Support. Would recommend it to a colleague.
Date of experience: November 16, 2021.
Source: Trustpilot
How to Transfer Outlook to New Computer Windows 11 Using Remo?
To move your Outlook data to the new computer, download and install Remo Outlook Backup and Migrate Tool both on your old and new computer. The following method can be applied to Outlook 2019, 2016, 2013, 2010, and 2007.
Backup Outlook Data from Old Computer:
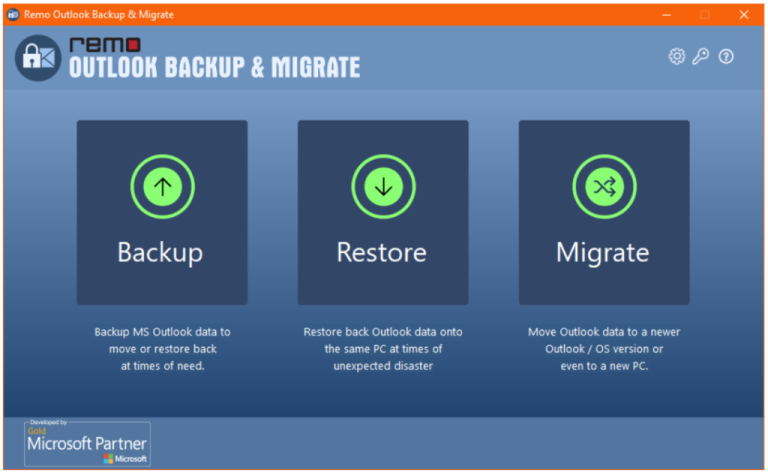
- Launch the tool on the computer from which you want to move Outlook.
- Click on Backup to take a backup of Outlook data.

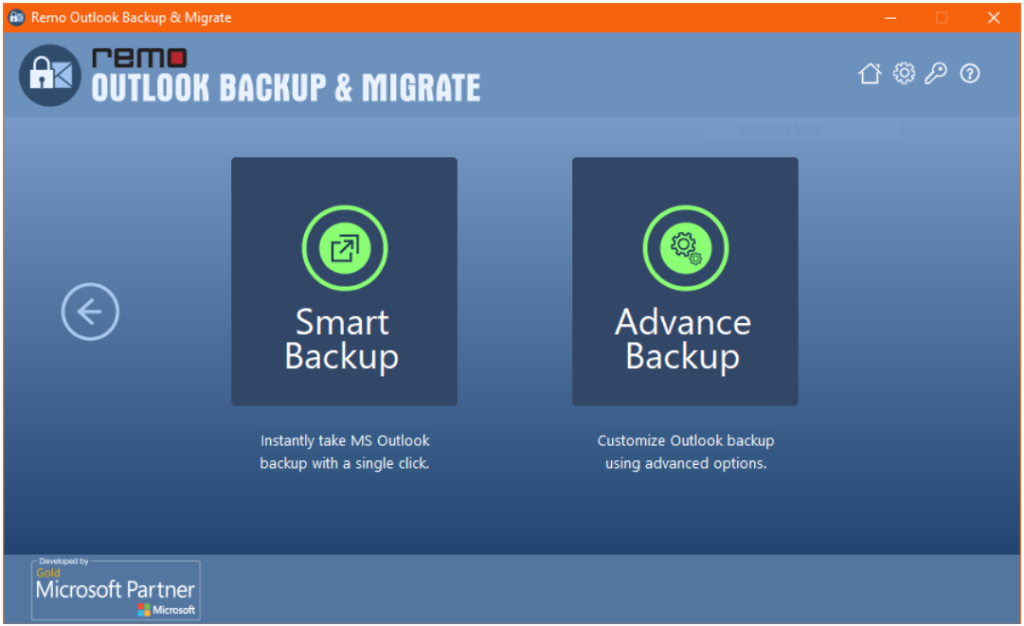
- In the next screen, choose between Smart Backup and Advanced Backup and click on next.
- Save the backed-up Outlook data to the desired location and copy the file onto a USB drive.
Import Outlook Data Into New Windows 11 Computer
- Launch Remo Outlook Migration Tool
Launch Remo Outlook Migration Tool on the new system to import Outlook and click Migrate.
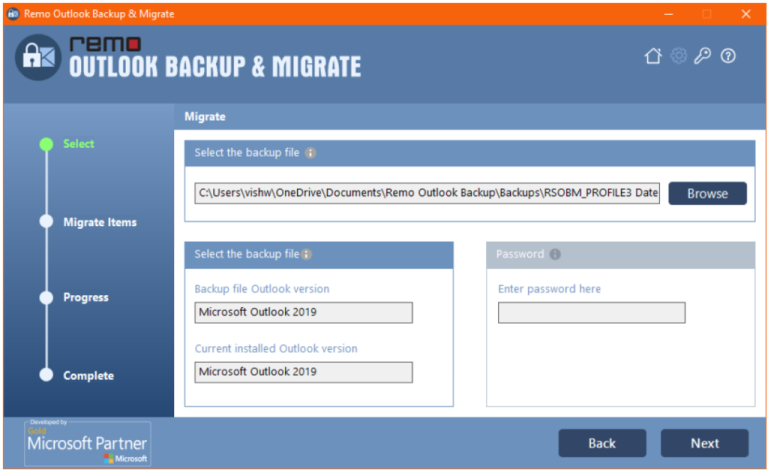
- Import Outlook Data File
Select the file you had taken backup from the Old computer and click Next.
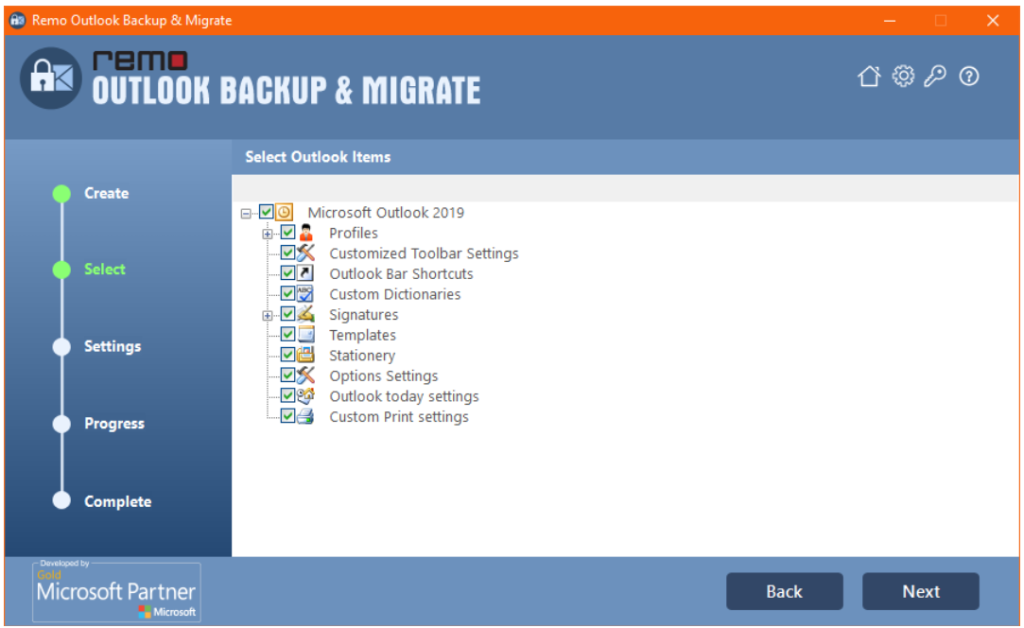
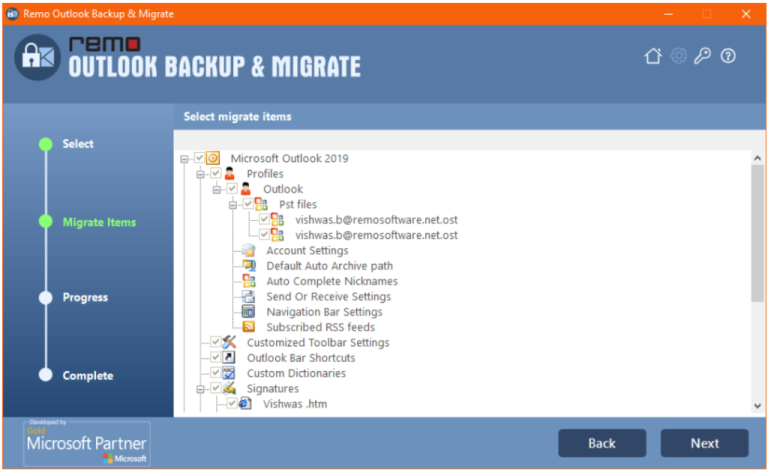
- Select Outlook Items to Migrate
In the next screen, select the Outlook items that you want to Migrate and click on Next.
- Click Finish
After completing the process, click on Finish, and then you have successfully moved your Outlook to a new computer.
Transfer Outlook PST files to New Computer Using Import/Export
Manually transferring Outlook to a new computer involves taking a backup of the PST file and moving it to the new system. Let's start manually moving Outlook PST to a new computer.
1. Export Outlook PST File
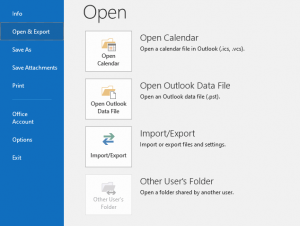
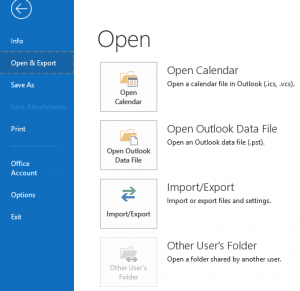
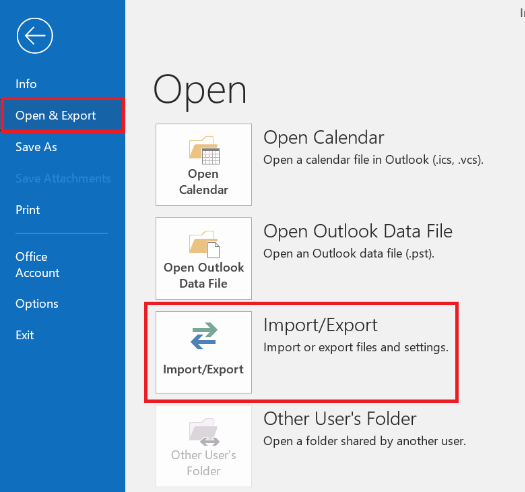
- Launch the Outlook application and click on the File tab.
- Next, select the Open option and click on the Import or Export button.
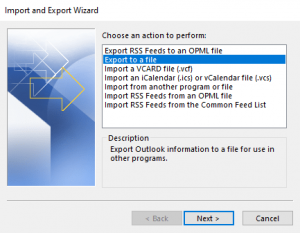
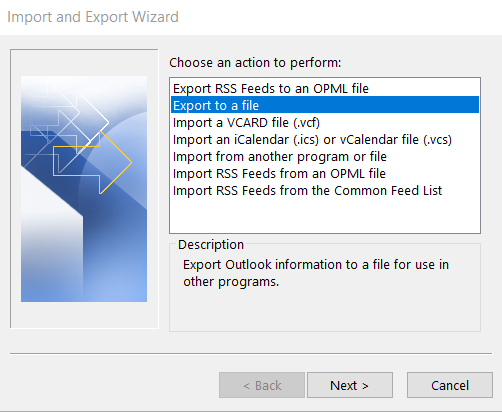
- Select Export to a file option and click on Next.
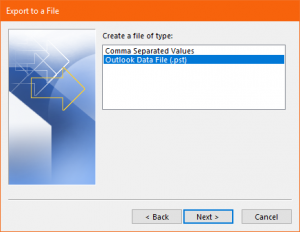
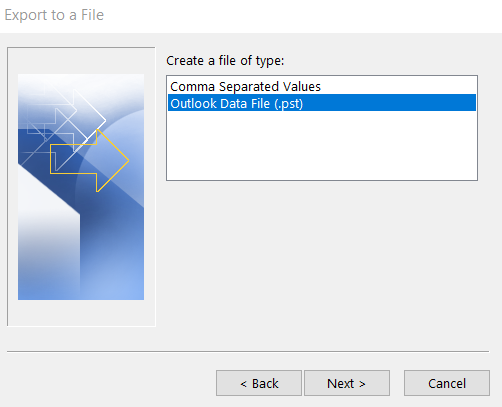
- Now, choose the Outlook Data File (.pst), option and click on Next.
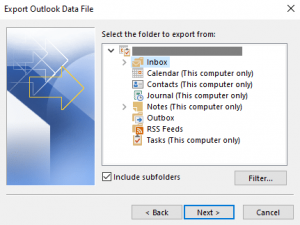
- Check the folders you want to back up and hit the Next button.
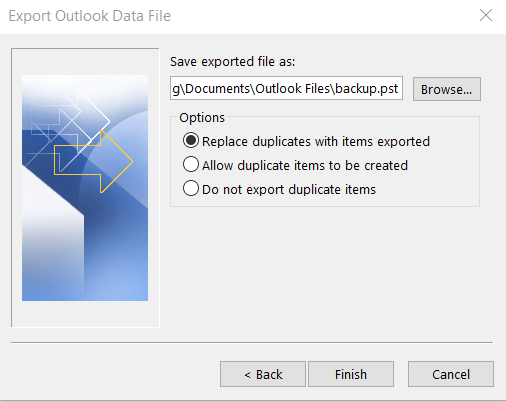
- Browse for a location, provide a name for your backup file, and then select Finish.
2. Import Outlook PST File to New Computer
To import PST files to a new computer, you need to copy the PST file and move it to the new computer through a USB drive or any way you are convenient with. Follow the below-mentioned steps when you are ready with the PST file:
- First, open Outlook and click on the File tab.
- Now select the Open and Export option from the left pane and click on Import or Export.
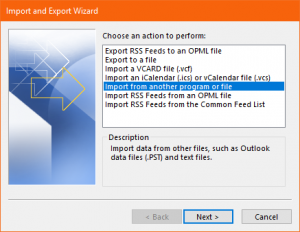
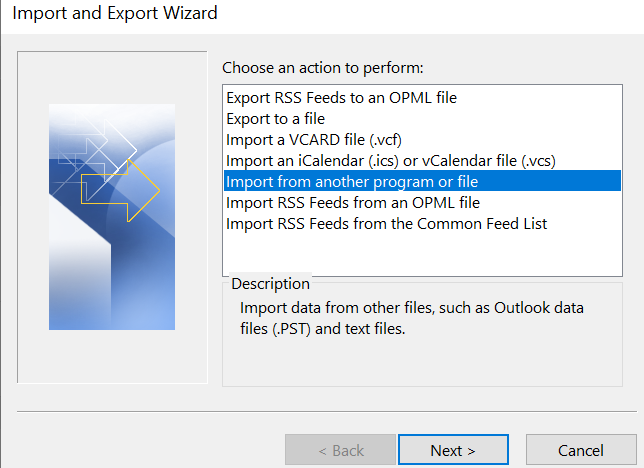
- Import and Export wizard will appear, where you have to select Import from another program or file option before clicking Next
- Click on the Browse button and go to the location where you have copied the PST file.
- There will be multiple options about how you want to manage the duplicates. It is better to select the Do not import duplicates option so that you do not get confused with duplicate items in Outlook. Click Next to go to the next page.
- Select the folders you need to transfer to the new computer. If you want to import all folders, select the topmost folder.
- Click on the Finish button.
Copy and Paste the PST File
Note: Manually locating the PST file and transferring it across the PC might sound simple. However, any interruption to the copy-pasting process can lead to data loss or damage to your Outlook data file. It is recommended to be mindful when you are manually transferring Outlook across computers.
Follow the below-mentioned steps to find the PST file location and copy-pasting the Outlook data file:
- Open the Outlook application, click on File, and go to Account Settings.
- Now select Data Files and click on Open File Location.
- You can see an Outlook PST File, copy the file onto a USB drive, and connect the USB drive to a new computer.
- In the new computer, paste the PST file in any location, whether a desktop or documents.
- Open Outlook and click on File.
- Select Open and Export, and click on Import/Export.
- Select the PST file you copied from the old computer.
After completing the importing Outlook PST file, you should log in to Outlook with your credentials. You have successfully moved Outlook emails to a new computer.
Migrate Outlook by Converting OST to PST
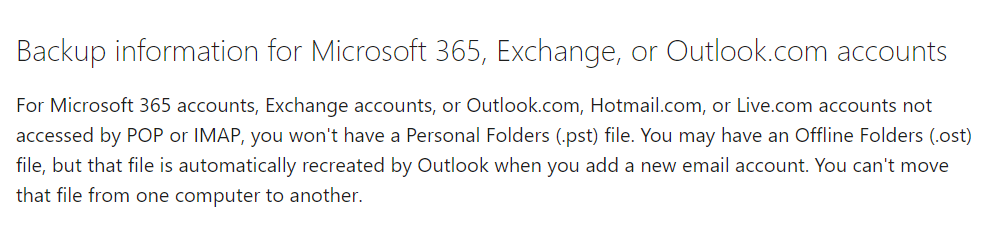
According to Microsoft, if you are a user of Microsoft 365, Exchange, Outlook.com, Hotmail.com, or Live.com accounts, you will not have a personal Outlook data file(.pst file). Instead, these users will have an Offline Outlook data file(.ost file) which is automatically recreated by Outlook when you log in to Outlook on a new computer. Moving Outlook OST file to new computer is not possible.
However, based on what I have experienced, converting OST to PST becomes necessary when there is a lack of connectivity with the Exchange server or if you encounter an orphaned OST file. However, it's crucial to emphasize the importance of backing up your OST file before attempting any conversion process.
You need a professional OST to PST converter tool to help you with Migrating Outlook to a new computer. However, I must highlight that this method is more suitable for those who specifically desire to migrate Outlook by converting the OST file to a PST format. For individuals seeking a more convenient and time-saving alternative, I highly recommend considering Outlook Migration Software, as mentioned earlier.
Steps to Transfer Outlook Data to New Computer using OST to PST Converter
Step 1: Convert Outlook Data File (.ost) to (.pst)
As mentioned above, if you are not able to connect your exchange server or have an orphaned .ost file you will need an OST to PST converter to convert the Outlook data file. There are many converters like Remo Outlook OST to PST Converter, and Stellar Converter for OST software. In this article, we will show you how to convert .ost files using Remo Outlook OST to PST Converter.
- Download and install the Remo Convert OST to PST tool on your old computer.
- Launch the software and select either Open OST File (If you want to locate the OST file manually) or Find OST File (If you want the software to locate the OST file automatically) and click Next.
- Choose a location to save the converted OST file and click on Convert.
- Now, the Remo OST to PST converter tool starts converting the OST file to a healthy PST file.
Step 2: Migrate Your Outlook Data to a New or Existing Profile on a Brand-New Computer
You can either create a new profile and import Outlook data, or you can move Outlook data to an existing profile using the PST file exported and converted as mentioned below:
- Open Outlook and click on the File tab.
- Select the Open and Export option from the left pane and click on Import or Export.
- In the Import and Export wizard, select Import from another program or file option before clicking Next.
- Click on the Browse button and choose the PST file you converted.
- Select the folders you need to transfer to the new computer. If you want to import all folders, select the topmost folder and click on Finish.
After considering all the ways to transfer Outlook data to a new computer, the decision on the best method ultimately lies with you. To simplify your choice, I sought advice from Praneeth Anand, a Research Analyst at Remo Software, who provided valuable insights.
According to Praneeth, if you possess technical expertise and feel comfortable navigating the complexities of Outlook migration, the manual transfer could be an option worth exploring. However, if you prefer a user-friendly and hassle-free approach, he strongly recommends utilizing the Remo Outlook Backup and Migrate Software.
| Method | Praneeth's Recommendation |
|---|---|
| Remo Outlook Backup and Migrate Software | Highly recommended. This software streamlines the process, ensuring a seamless transfer of Outlook data. |
| Manually Transfer Outlook data file | Not recommended for complex scenarios. It can be time-consuming and prone to errors, risking data integrity. |
| Convert OST to PST to transfer Outlook data | Recommended in specific situations, such as when there is no connectivity with the Exchange server. However, it requires technical expertise and precautions. |
By referring to this table and considering Praneeth's advice, you can confidently choose the most suitable method for your Outlook data migration needs.
How to Transfer Outlook PST File New Computer on Mac?
To migrate Outlook from one computer to another computer on Mac, you need to follow the below-mentioned steps:
- Open Outlook under the tools tab, and click on Export.
- From the Export to Archive (.olm) window, select the important items you want to export and click on Continue.
- Save the file as a .olm file. After completion of the Outlook export process, you will be seeing a notification; click on Finish to complete the export process.
- Copy the .OLM file on a USB drive to move Outlook OLM file to new Mac computer
- Now to import Outlook to a new Mac computer, open Outlook under the Tools tab and click on Import.
- In the import window, select Outlook for Mac data file(.olm) and click on the right arrow to continue.
- Click on import and choose the Outlook .olm file that you had exported from the old computer and click on next continue.
- After completion of the Outlook migration process, click on Finish
You can restart Outlook and log in using your email address and password to access your Outlook data transferred from your old Mac to your new Mac.
Bonus Tip: How to Move Outlook Archive to New Computer?
Here are steps to move the Outlook archive to a new computer:
1. On your old computer, open Outlook and Navigate to File.

2. Under the Open & Export Tab, Click on Import/Export.

3. Select Export to a File and click on Next.
4. Choose Outlook Data File and select the folder that contains the items you want to export.

5. Choose a location to save the file, and click on Finish.

6. Transfer the archive file to a USB.
7. Use a USB drive or cloud storage to transfer the exported archive file to a New computer.
8. Import your Outlook archive to your new computer using your USB.
9. Open Outlook and navigate to the File.

10. Select Open and Export and click on Import and Export.
11. Select Import from another program or file and Click on Next.
12. Select Outlook Data File and Next.
13. Click Browse, locate the backup file, and Open.
Final Thoughts:
In conclusion, I aimed to make your transition from an old computer to a new one as smooth as possible by providing assistance in moving your Outlook to the new computer effortlessly. I owe a huge thanks to Remo Backup as well as Migrate for Outlook for their incredible support throughout this process.
I'm eager to hear your feedback in the comment section below, sharing whether this article helped you with your Outlook migration. Your valuable input is what drives us to continuously improve our content. If you have any questions during your migration, feel free to contact our tech support team.
Please help us spread the word by sharing this article, as your support allows us to assist more individuals like yourself. Together, let's make your Outlook migration a hassle-free experience. Lastly, Thank you for being a part of our community!
Frequently Asked Question
Outlook export files are usually saved in a location that is stored by the user during the export process. The default file extension for an Outlook export file is pst. The exported file will be stored in the following locations.
1. By default, the Outlook exports are saved to the documents or Outlook file folders. You can choose your location while exporting your Outlook.
2. It can be saved as a CSV file, and while exporting, you will get an option to save a file in your desired location.
3. It allows you to export your Outlook to other formats like Excel, Access XML, etc.
Here are the steps to activate Outlook on my New Laptop:
1. Launch Outlook on your new laptop.
2. You will be prompted to Sign in with your Outlook account.
3. Once you have signed in, you will be asked to Enter your product key. This key is usually found on the packaging or in an email that was sent to you after purchasing Outlook.
4. Follow the prompts to activate your product key and Complete the Installation
5. Once it is activated, you can start using Outlook on your new laptop.
Transferring Outlook emails to a new computer in 3 simple steps
Step 1. Backup Outlook data on the old computer
1. Open Outlook on the old computer
2. Click on the File menu,, then select “open and export”
3. Then select Import and Export
4. Choose Export to a file and click Next
5. Select Outlook data file and click Next
6. Select the mailbox or folder you want to backup and click Next
7. Choose a location to Save the backup file and give it a name
8. Click Finish to start the backup process
Step 2. Transfer the backup file to the new computer
1. Copy the backup file to an External hard drive or USB drive.
2. Transfer the drive to the New Computer
3. Copy the Backup File from the drive to the new computer’s hard drive.
Step 3. Import the Backup file into Outlook on the new computer
1. Open Outlook on the New computer
2. Click on the File menu, then select Open and Export
3. Select Import and Export
4. Choose Import from another program or File and click Next
5. Select Outlook Data File and click next
6. Choose the backup file you transferred and Click Next
7. Choose the mailbox or folder you want to import and click Next
8. Choose the destination folder for the imported data and click Finish
9. Wait for the import process to complete
this software looks very promising I have one question do the old and new computers need to be named identically?
Hi Philip, You need not worry about naming computers identical. You just need to install, Remo Outlook Migration Tool on both the computers. Take backup from the old computer and easily transfer to the new computer.